Carburettors GT380 J-K
Time to start the overhaul of the carbs. The first time I’m doing this, so it has to be learning by doing + take a lot of photos and watch YouTube.
Sorting out the cables and carbs:

L, M and R :

This carburetor is the 33011 type. The last letter will be L, M og R for Left, Middle and Right.
Remember to organize all parts in boxes and don’t mix between L,M and R.
Removing the throttle valve:

Uncrew the top and slide off.
Removing the throttle cable and return spring:

Remove the throttle cable from the valve.
Return spring:

Remove the return spring.
Removing the choke ( starter piston):

Remove and inspect the starter valve (choke)

Remove the Drain plug and the inspection bolt for the throttle valve.
Removing the float, float valve and seat:

Inspect the valve for any worn.
Removing jets:

Needle jet:

Insert a screw and give it a tap with a hammer to get loose. Remove from the other side.
Note: The needle jet is also named Needle nozzle in the manual.
Ultrasonic cleaning:
Wather blasting:
After the ultrasonic cleaning I got all the alu parts wather blasted, looks very nice 🙂

Next step will be the assembling process, but not today.
Assembling:

All channels were well air blasted, cleaned with solvent, and air blasted again.
Mounting the needle jet (Needle nozzle):

I made a tool in brass for a more easy way to insert the needle jet. Please be aware of the lock pin and the orientation of the needle jet. Insert the jet from the other side and give tap the tool gently if needed.
Mounting the Main Jet:

Use correct size (with) of the washer. If it’s too narrow, the Needle nozzle can slide out. As shown in the picture above the Main jet will also lock the Needle nozzle in place.
Hard to see how it can slide through on the other side, working against gravity, but can happen during the assembling process it the carburetor is turned upside down. But as mentioned above, the main jet will lock it all in place if the spacer has the correct diameter.
The standard Main jet size is 0,8mm, marked as 80.
Mounting the pilot jet:

#22,5 size according to the manual.
Mounting the Air Jet:

Turn the Air jet all the way in, than 1,5 turn backwards.
Note: The picture is from the left carburetor. For the M and R, the jet is fitted from the other side.
Mounting the Idle Jet:

Did some cleaning and polishing before mounting.
Gasket:

I used the old gasket as a template, drew the outline and cut a new one in 1mm gasket material. Seems to fit quite well.
Float:

Warm the water almost to the boiling point and dip the float into the hot water.
To check the float for leakages ( it’s 50 years old and fragile) put in hot water and look for bubbles. Locate the hole and clean well before soldering.

This is not easy to fix. Clamp the part gently so it doesn’t fell apart due to the pressure inside when heating up.
Mounting the Float Seat and valve:

You can use the old one if it’s not worn.
Mounting the Float and Float Pin:

The float height will be adjusted later on when I have all three carbs ready.
Almost done:

A simple test to see how it all fit together. I think I have learned a bit so far. Hopefully the images can be at help for other as well. At least for me, when I’m doing the M and R carburetors. But not tonight.
Drain plug and inspection screw:

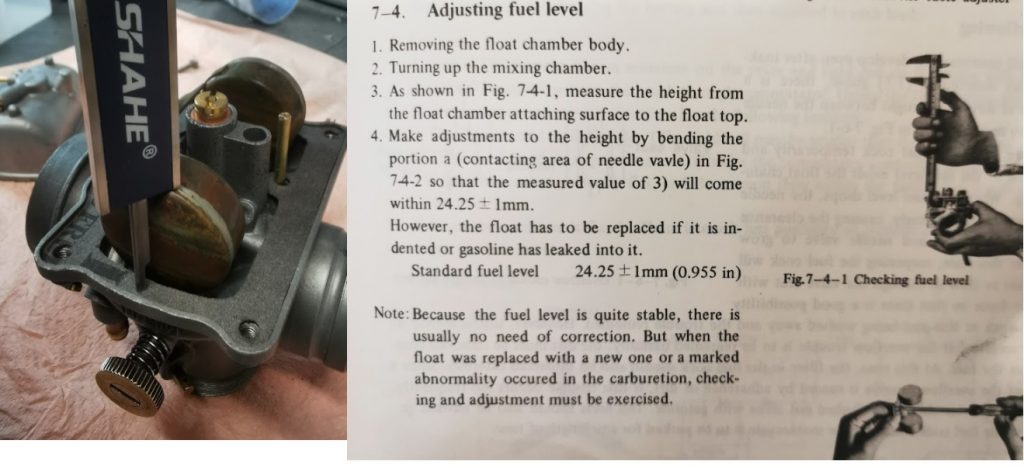
Float height :

Adjusting the fuel level according to the service manual.
Needle jet height:

The circlip at the needle jet for the center carburetor should be in the middle position. For the right and left carb, mount the circlip in the second groove from the top. This will give a bit more fuel to the center cylinder.
Rubber hose:

Replace the rubber hose if it’s old and hardened. I got them all new and the yellow arrow shows the directions for mounting the rubber hose.
Mounted on the bike:

Before routing the throttle and choke cables I mounted them all on the bike. Will buy new clamps for the rubber hoses so it all looks nice shiny.